How to get white (efflorescence) stains off of brick and metal

Home ownership is a whack-a-mole of projects.  As soon as one thing is fixed or completed something else pops up.  Something can be newly renovated and a year later it already needs upkeep.

The Brick and the Patio

When we built on the extension at the back of the house we finished it off in brick to match the rest of the house.  The deck/balcony is finished with a bluestone.  When the work was in progress we had several discussions about drainage and wanted to avoid putting in an unsightly drainpipe.  The solution we came up with to slightly pitch the surface away from the house and put in a weep hole to let excess water that seeps into the stone pour out.

The unfortunate result was that when water did seep out it brought with, what we learned, was something called an efflorescence residue that stained the brick outer wall, the bluestone patio as well as the outer doors to our bedroom.  We corrected the problem by removing the weep hole and sealing the stone with waterproof grout and a sealant on the terrace but we still had the stains to deal with.

Efflorescence:  is the migration of a salt to the surface of a porous material, where it forms a coating. The essential process involves the dissolving of an internally held salt in water, or occasionally in another solvent.

IMG_9440

We had several failed attempts at cleaning it.  We tried scrubbing with soapy water, then power washing and various cleaners from the hardware store.  Only one thing worked: Klean Strip Green Safer Muriatic Acid Jug 128 Oz

You have to be extremely careful using this product as it is very corrosive.  USE THIS PRODUCT ONLY FOR BRICK AND BLUESTONE.  We put up plastic to protect the painted doors.  Follow the dilution directions exactly.

Materials:

  • industrial rubber gloves
  • eye protective wear
  • spray bottle
  • a bucket to dilute the solution
  • scrub brush

Here’s a tip: don’t use an orange Home Depot bucket–we had slightly peach-colored grout on the patio for months!

Carefully spray the diluted solution on the brick so it does not splash in your face (wear protective glasses).  When the acid hits the efflorescence it will fizzle a little. Then use a scrub brush to loosen the efflorescence.  Next, use a power washer or hose to rinse off.  We couldn’t believe how well this stuff worked. It even removed green moss that can grow on the brick after the rainy season.

IMG_0735

For the bluestone patio, we did not have to be so careful and poured the diluted solution directly on the stone.   You will see the solution going to work on the stains straight away.  Use the scrub brush to loosen the efflorescent residue a little at a time.  When complete, power wash the area and repeat process if necessary.  It also helped with the grease and other stains from food, candle wax and spilled red wine from all the awesome BBQs we had over last summer.

Then once the patio was clean we sealed it with Miracle Sealants – 511 Impregnator Penetrating Sealer 128 oz. – Gallon to protect it from stains in the future.

The Doors

Our painted metal clad Marvin doors had to be treated with more delicacy.  We were told a diluted CLR solution would work.  We tried this and it was a lot of work to scrub the surface clean of the residue and you have to be sure to rinse immediately because technically CLR is not for painted surfaces.  After several days of cleaning only small patches, we turned to the internet and discovered that vinegar can work as well.  The best part is that it is safe to use, cheap, and required less scrubbing than the CLR.  You can use it undiluted.  We recommend that you use a soft scrub sponge so you do not scratch the paint.

IMG_0771

The process took several days to complete because after scrubbing for an hour or two, your wrists get sore.  See the clean area on the door to the right below.  In between using this method we alternated between scrubbing and power washing. It was labor intensive but we eventually got the doors (mostly) clean.

IMG_0828

Part three of the media room: The finishes

Once everything was installed and in working order, it was time to finish the room off so that we could actually use it.

Since the back wall of the room is original plaster and somewhat uneven hanging artwork was problematic.  Wallpaper seemed like a good option to give the room some interest.  At first, we thought a mural would be fun but worried it walked the fine line between modern and dated.  We considered some patterns and colors and eventually chose Big Apple by York Wallpaper.  We liked the simple pattern of the repeating buildings and the way it had some depth to give the room a little extra dimension.

RK4507 Big Apple by York

York Wall coverings RK4505 Urban Chic Big Apple Wallpaper, Cream/Beige/Brown

We bought the cream/beige color but there is also one with a blue tone.

Normally, we are DIY’ers but we’d never wallpapered before and did not want to mess it up, and well, we are getting tired. We found an installer on Yelp.  We called a few and, as usual, not many installers were interested in such a small job.  One guy was rude, one guy was out of town indefinitely, the only female company wanted $750 to do one wall! We ultimately chose Jorge, from 78 & Sunny wallpapering.  He arrived on time, put on his headphones, and went to work.  He was efficient, polite and cleaned up after himself.  At this point, we know that is all you can ask of a contractor.  We were very happy with the outcome.

IMG_9144

IMG_9145

IMG_9146

The room is pretty small, especially with the cabinets, so there weren’t very many design/decorating decisions to make.  Our cats like to scratch furniture so we did not want to get an expensive sofa.  We also needed one that we could pull out for guests.  We chose IKEA for the price as well as design and are very happy with the quality so far and at $599, it won’t be such a great loss if it gets damaged over time.  Pillows are also from IKEA.

IMG_9363 (1)

For artwork, we dug through boxes in the basement to find old family photos, original as well as our daughter’s artwork.  For this room, we decided to use only black frames and we also used the Keepsake app to have a couple of Instagram photos printed and framed.  We mixed family photos with artwork and scenery photos taken during our travels to give it a mixture of color and balance.

IMG_9507

I wish I could say we had it all planned out before we hung the first photo but we basically started at one end and moved along the wall.   We still have a few spaces to fill but have an exciting trip planned for this summer and will surely take lots of photos.

For furnishings, we finished the room off with two side tables from CB2 and exported a lamp from our living room upstairs.  We also ordered the pouf from Walmart.com to use as a footstool.

IMG_1162

We love our new cozy TV/storage/laundry room of requirement!

Part two: Installing a Media Room

While waiting for the cabinets to arrive we prepared all the wiring for the TV and surround speakers and plumbing for the kitty litter (we’ll explain later).

IMG_0437

We were already ahead of the game because we had the plumbing and the cable wires already installed, we just needed extra outlets.

We wanted to make sure there were enough outlets for the appliances, tv, printer and our new Xbox (it’s been a long time coming).  We also needed to make sure that we had the proper wiring for the surround sound speakers.  Before the walls went up we made sure we installed wiring already before the contractors put the drywall up so that when the time came we had options about where we wanted outlets and cable wiring.

Our first step in cabinet installation was to lay down a raised foundation to be the base of the cabinets.

IMG_0465

IMG_0448

The electric washer and dryer were too large for standard cabinet sizes so we ordered custom doors and had to create a cabinet box for them with no back.  So that the cabinet would not move and warp we put in a bar to keep the false cabinet stable.  We chose electric appliances because they are smaller than those sets with a gas dryer.

IMG_0462

IMG_0463

IMG_0459

flushable kitty litter

You can’t see it here but we also cut extra holes in the side of the cabinet to accommodate the plumbing pipes that would attach to the water pipes for the washer and dryer for our flushable kitty litter.

IMG_0477

Next, we had to lay a strong base for the top cabinets to rest on because drywall is not strong enough to support the cabinets.

IMG_0483

IMG_0484

Who can spot the mistake? We hadn’t planned on this set up before we installed the ceiling lights – they are a little close to the cabinet than we’d have liked but c’est la vie.

IMG_0485

Once all the top cabinets were in place we created a support for the TV panel.  Our cabinets are very deep to accommodate the washer and dryer.  We did not want deep bottom cabinets and shallow top cabinets so we chose all deep cabinets for extra storage. Basically, we were creating a false back for the TV so the cabinets would appear uniform.

Once that was ready, we cut all the holes and installed all the electrical outlets and

IMG_0502

The whole layout with all our hookups but there are still a lot of empty cupboards for storage left.

IMG_0491

You can see the Cat Genie in the center cabinet here. It works really great by scooping the solids and sending them through the drain pipe and sending water through the other pipe to rinse and clean the bowl that contains washable litter pellets.  Every once in a while you need to spray some bleach during the wash cycle to keep it smelling clean.

IMG_9364

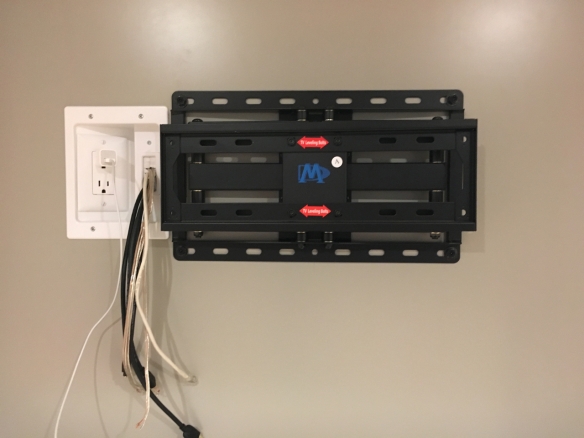
We did not want any unsightly wires leading to the TV so we installed outlets on the panel and the support to hold the TV.

IMG_9144

We’d already installed the speakers (see white speaker in corner) in the wall and hooked them up.

IMG_0356IMG_0363

The finished product, complete with the hole for the cat litter.