
Yes, it has been a while since we’ve written a post for our blog. We’ve been in a frenzy trying to get the third floor unit into shape since we found out from our Expeditor that we can rent it out before we get the Certificate of Occupancy for the building, as long as there are no safety concerns. We had him do a run through and we are good to go.
We did not have our contractor renovate the third floor because all it needed was cosmetic work, which we thought we could do ourselves. We did hire someone to remove and drywall the drop down ceilings and install the new floors. We also paid our electrician to do all the ceiling lights but the rest was us and our go to guy, Keith, who we met when he installed our floors.
Here are some before and afters:
Livingroom

View from back of house into dining – living area

We used the contractors for our duplex unit to put up fire resistant drywall in the hallway to meet with fire codes. We decided to close up one of the two doors that lead into the apartment. In retrospect, and there is always perfect hindsight in renovation, we should have moved the entry door to the left so it would be easier for prospective tenants to get their furniture through the door from the stairs.

Left side of the living area from the back.
We removed the 70s drop ceiling and plaster ceiling (and that added about 9 inches in ceiling height), recessed lighting and ceiling fans. We demolished the cosmetic archway and that little half wall to the kitchen to give it an open floor plan. If you recall, we removed all of the floors to soundproof them then installed laminate. We chose it mainly because it is durable and inexpensive but also because we hated the look of the wood floors we could afford. We replaced all the baseboard moldings with ones similar to the originals. To the right, we stripped the plaster off the fireplace to expose the original brick and give the room a little architectural interest. We couldn’t afford to get this chimney working so it is just decorative.

Kitchen

Here we are (above) removing the old linoleum to expose the pine wood floors. They were not in great shape and we wanted to do soundproofing so they had to go. On the upside, we put them on Craigslist and sold them to homeowners in Bed Sty so they will have another life. We removed the half wall and the wallpaper, which was no easy task.

We replaced the window by the refrigerator because it was broken. We kept the original molding around the window but replaced the baseboard molding and the molding around the double window because it was just easier. We replaced the permanently fogged glass in 1 sash of double window, which was amazingly cheap at $50 and it now looks like a new window.

We originally were going to paint these old top cabinets and put in a new stand alone bottom cabinet from IKEA with an inexpensive counter top but the more we looked at them the uglier they got. We thought as long as we are ripping the floor up we should redo the cabinets too and be done with it. We used the same company down the street that we used for the kitchen in our unit.
 We went with basic modern wood cabinets so that they would not go out of style too soon. Before you say it, we know the white appliances with the stainless steel dishwasher is not the best look but the fridge and stove were in great shape after a good cleaning. If they ever fail, we will replace them with stainless, which is why the dishwasher is in that finish. We extended the cabinets to the ceiling so there is a lot more cabinet space than before and we removed the washing machine to add drawer space. We were able to get a quartz countertop from a remnant piece from the supplier used by Park Slope Kitchen Gallery and that saved us a lot of money. It may be white but it is manmade from quartz so it is the most durable. We were also able to save the tin ceiling with a good coat of paint, some bending and a little painter’s caulk.

For the bedroom it was all basic cosmetic work. The previous owners had already removed the fireplace mantels and the brick was covered in plaster so we left it. The best news was that we were able to save original plaster ceiling. We skim coated it to smooth it out and left the crows completely intact. It is amazing what a little paint and new floors can do.


We replaced the floor, repaired and painted the ceiling and crown molding. We installed new entry, closet and bathroom doors. We re-plastered some of the walls, painted, replaced the baseboard molding and wire brushed and painted the radiators. We still haven’t found a ceiling light we like, so please ignore that dangling lightbulb.

Below is that small room off of the bedroom that you see in so many brownstones. The previous owners, whose family owned the house for two generations, told us that when they were growing up two of the children slept in there. I think that was the norm back then.

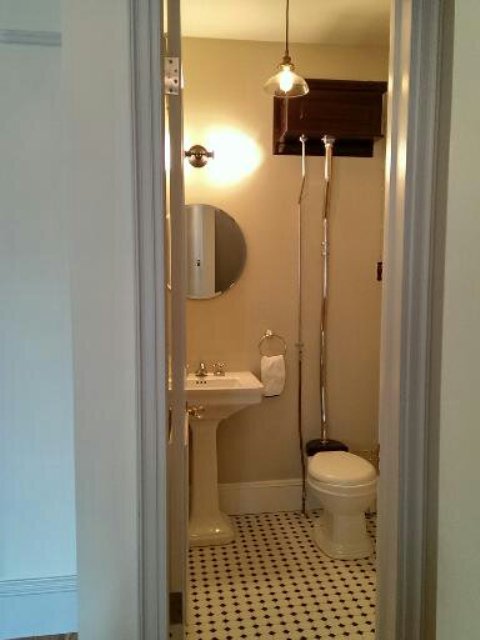
When our house was built in 1899 it did not include bathrooms so the bathroom in the rental was carved out in the middle of the unit, and thus was a bit wonky. For some reason (probably to accommodate the plumbing) the installers decided to raise the floor up about 8″ resulting in an awkward step to enter. It’s only door was to the outside hallway which was not fire rated so it had to be removed. We add a new one one into the bedroom–so the tenant’s doesn’t have to go outside his or her apartment to use the loo. Unfortunately there was nothing we could do about the step except make it look better with a marble saddle.

Bathroom

Right after we closed on the house we purchased a new modern toilet and vanity sink for a great price from a woman who was combining two condo apartments in Boerum Hill. The original plan was to reglaze the tub and try painting the tiles but when it came down to it we thought now is the time to replace the tub and tiles. We had an incident in our previous condo where the tub in the apartment above us rusted through around the drain and caused damage to our ceilings in three rooms before the source was discovered. The tub was old and we did not want to take that chance so we renovated the whole room with the help of our handyman and now everything is shiny, new and clean. Much to our chagrin, we did a better job installing the tiles here than our contractor did in our unit!

Finally, we added a stacked washer and dryer to the laundry closet that used to only have a dryer.

We are so happy the apartment is finished but sad that we will no longer be able to use it for our daughter’s slumber parties and as a laundry suite. Now the next challenge is renting it out to a good tenant!


 The lighting we picked out from
