
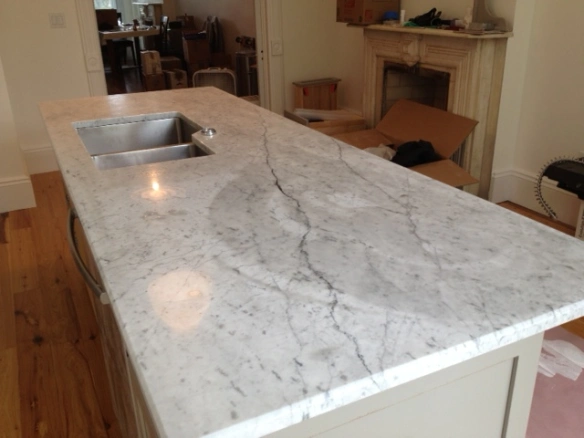
We were warned that marble countertops stain and scratch easily. We ignored the naysayers because we love the look of marble but we have to admit, they were correct. After a year our counters have scratches, surface marks that look like water spots and glass rings and even a few chips. Surprisingly, we have very few discoloration marks.
New shiny and clean but do you see those shadows–that is where the installer put sealant on it and it left some marks.
Before you can figure out how you go about removing these marks you first have to figure out what they are. After some head-spinning research on the Internet, I reached out to the experts and contacted MB Stone Restoration and Supply, Inc. , who seem to have one of the few products on the market for removing damage like etches and stains.
Damage defined
In a nutshell, they explained etches vs. stains as: A stain is a discoloration of the stone produced by a staining agent that is actually absorbed by the stone.
Etches have nothing to do with the porosity or absorbency of the stone. It is still a discoloration but it’s worse than a stain because it is caused by actual damage to the stone surface.

lots of etches
So all those light colored “stains” that look like “water spots” or “water rings,” are actually marks of corrosion (etches) created by some chemically active liquid (mostly – but not limited to – acids) which had a chance to come in contact with your marble.

Lemon juice damage is the worst
As with all things renovation there is good news and bad news. The bad news is, if you have honed marble or the etch is severe (deep to the point that it looks and feels rough), then you need a professional stone refinisher. The good news is if you have polished marble, like we have, then you can diminish the appearance of some of these etch marks. If the etch is light (the depth is undetectable by the naked eye, and it looks and feels smooth), then there are a few polishing creams or powders like MB Stone’s that might do the trick. MB Stone was nice enough to provide me with a sample of their MB-11 marble polishing powder.
How to diminish etch marks using:
MB Stone Care Marble Repair Kit
Supplies
- rubber gloves
- paper towels
- clean cloths
- water

The instructions say to pour a little powder on the mark press down firmly. Now maybe I am a weakling but I had to press down pretty hard and go over it a few times then rinse off dry and repeat. It took about 2-3 times average for ours.
before

glass ring etch
after

Victory!
Recommendations
We recommend getting this product when your surface is brand new and use it for maintenance as you notice each mark because tackling every tiny little circular spot is exhausting. Afterwards, wipe the counter with a clean moist cloth and then add their polishing liquid to give it a nice shine and protect it.
Now that the larger ringed etches are substantially gone and the counters look much better but somewhere down the line we will have to get a professional stone refinisher. We wish we had done this research before our counters were installed!
before

after

Helpful tips for caring for marble surfaces
- wipe up all liquid drips immediately–even the sealant the installer put on caused marks!
- always use a large cutting board or other surface especially when working with citrus foods.
- when you have a party put a crap load of coasters on the counter because after a few glasses of wine you might forget to obsessively wipe up after your guests.
Stains
We do not have any bad stains yet but I though I would include the instructions from MB Stone on how to make a homemade poultice for removing them for future use.
The properties of a poultice are basically a combination of an absorbent medium (must be more absorbent than your stone) with a chemical. The chemical will attack the stain inside the stone while the absorbent agent will help draw it out. The chemical agent you choose will depend on the type of stain.
Supplies you will need:
- an absorbent like baby powder, paper-towels or diatomaceous earth (the white powder chemical in a pool filter).
And one of these:
- Hydrogen peroxide clear 30/40 formula (the kind salons use not the kind for cuts) for organic and inorganic stains like coffee, tea, gravy, mustard, ink, dyes or dirt
- Acetone (hardware not nail kind) for oily stains like cooking stains, butter, or any animal fat
- Bleach for mold or mildew (xx also has a product MB-9 for this)
- “Iron Out”** from hardware store for metal stains like rust
Directions:
If you’ve chosen talc powder (baby powder) as your absorbent medium,
- You mix it – using a metal spatula or spoon – in a glass or stainless steel bowl, together with the chemical, to form a paste just a tad thinner than peanut butter (thin enough, but not running) Now you have made your poultice.
**If you’re attempting to remove a metal (rust) stain, first you melt the “Iron-out” with water – according with the directions written on the container – and then you mix it with an equal amount of talc powder, adding water if it turns out to be too thick, or talc if it’s too “runny.”
- Apply the poultice onto the stain, going approximately 1⁄2” over it all around, keeping it as thick as possible (at least 1⁄4”).
- Cover the poultice with plastic wrap, and tape it down using masking tape.
- Leave the whole thing alone for at least 24 hours, and then remove the plastic wrap.
- Allow the poultice to dry thoroughly! It may take from a couple of hours to a couple of days or better, depending on the chemical. Do NOT peek! This is the phase during which the absorbing agent is re-absorbing the chemical that was forced into the stone, together (hopefully!) with the staining agent, and you do NOT want to interrupt that process!
- Once the poultice is completely dry, scrape it off the surface of the stone with a plastic spatula, clean the area with a little squirt of our MB-5 Marble, Granite & More Spray Cleaner, then wipe it dry with a clean rag or a sheet of paper-towel.
If you decide to use paper-towel instead of talc powder, make a “pillow” with it (8 or 10 fold thick) a little wider than the stain, soak it with the chemical to a point that’s wet through but not dripping, apply it on the stain and tap it with your gloved fingertips to insure full contact with the surface of the stone. Then you take it from the point 3 above.
Check back with us this spring when we try this out on our blue stone patio, which by the way no one warned us is easily stained by any oil-based animal fats like those produced when barbequing.


 We had to tighten up the chains several times (as the winch only provides about 6 feet of cable) and dig around the root system a bunch but we got the tree down.

 Afterwards, there was some more digging and cutting with an axe to get out the roots out but we are now stump-free.